 RISC-V Test Matrix
System Version
13
Status
BASIC
Last Update
2025-10-22
Debian 13 D1 Test Report
Test Environment
Operating System Information
- System Version: Debian Trixie
- From
sudo debootstrap --arch=riscv64 trixie rootfs http://deb.debian.org/debianto make rootfs burn to SDcard
Hardware Information
- Sipeed Lichee RV Dock
- Power Adapter
- A microSD card
- A USB to UART Debugger
Github Repo you need
- https://github.com/riscv-software-src/opensbi.git
- https://github.com/smaeul/u-boot.git
- https://github.com/jamesgraves/licheerv-debian-linux/blob/main/licheerv_linux_defconfig
Installation Steps
OpenSBI
Clone sourcecode from github
git clone https://github.com/riscv-software-src/opensbi.gitCompile
make CROSS_COMPILE=riscv64-linux-gnu- PLATFORM=generic FW_PIC=y -j$(nproc)The file you just generated is at build/platform/generic/firmware/fw_dynamic.bin
U-Boot
Clone sourcecode from this branch d1-wip
git clone https://github.com/smaeul/u-boot.git -b d1-wipConfiguration and compile
make lichee_rv_dock_defconfig

make CROSS_COMPILE=riscv64-linux-gnu- OPENSBI=../opensbi/build/platform/generic/firmware/fw_dynamic.bin -j$(nproc)
After that you get a u-boot-sunxi-with-spl.bin file
Later you’ll need to copy that on your SD card
Linux Kernel
First you need to copy kernel sourcecode from d1/all branch
Then you get the config file from another repo
git clone https://github.com/smaeul/linux.git -b d1/all

Here you need this  rv dock's `config` file:https://github.com/jamesgraves/licheerv-debian-linux/blob/main/licheerv_linux_defconfig
Configuration and compile
You get this Image file from arch/riscv/boot/Image
make ARCH=riscv licheerv_linux_defconfig

make ARCH=riscv CROSS_COMPILE=riscv64-linux-gnu- KCFLAGS='-fno-asynchronous-unwind-tables -fno-unwind-tables' -j$(nproc)
extlinux.conf
This file contains some vital parameter for booting
You need to modify the rootfs’s location if you need
Label Debian
	LINUX /Image
	APPEND root=/dev/mmcblk0p2 rw rootwait console=ttyS0,115200 earlycon=sbi
rootfs
This part is the guide for building up rootfs
mkdir rootfs

sudo debootstrap --arch=riscv64 trixie rootfs http://deb.debian.org/debian
Then use chroot to do some jobs before actual running the system
sudo chroot rootfs

passwd

apt update

apt install ...

exit
rootfs Image
- Build a 1 GB image file
- Copy rootfs to this image file
dd if=/dev/zero of=rootfs.img bs=1G count=1

sudo mkfs.ext4 rootfs.img

mkdir rootfs_mount

sudo mount rootfs.img rootfs_mount

sudo cp -rfp rootfs/* rootfs_mount

sudo umount rootfs_mount

rm -r rootfs_mount

sudo e2fsck -f rootfs.img

sudo resize2fs -M rootfs.img
Flashing Image
First of all, you need to know where your SD card at: sudo lsblk
- Set up your SD card with
sgdisk
sudo sgdisk /dev/sdb -o

sudo sgdisk /dev/sdb --new=1:4096:69631 --change-name=1:boot

sudo sgdisk /dev/sdb --new=2:69632: --change-name=2:rootfs

sudo sgdisk /dev/sdb -p- Put U-Boot on your SD card
sudo mkfs.vfat /dev/sdb1

sudo dd if=./u-boot/u-boot-sunxi-with-spl.bin of=/dev/sdb seek=256

sync- Copy kernel and extlinux.conf to the SD card
sudo mount /dev/sdb1 /mnt

sudo mkdir /mnt/extlinux

sudo cp ./linux/arch/riscv/boot/Image /mnt/

sudo cp ./extlinux.conf /mnt/extlinux/

sync

sudo umount /mnt- Flash rootfs to the card
sudo dd if=./rootfs.img of=/dev/sdb2 bs=4096

sync
Actual Results
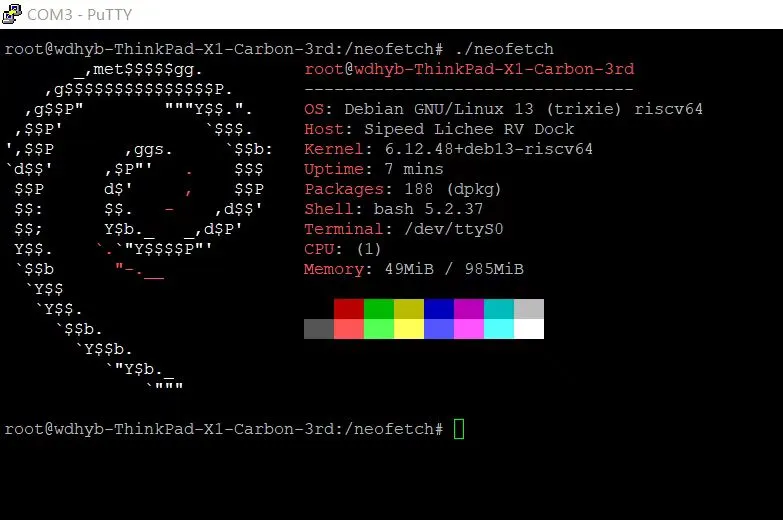
neofetch
Boot Log
root@wdhyb-ThinkPad-X1-Carbon-3rd:~# uname -a
Linux wdhyb-ThinkPad-X1-Carbon-3rd 6.1.0-rc3-443875-gb466df90d48f #1 PREEMPT Sat Oct  4 20:28:29 CST 2025 riscv64 GNU/Linux
root@wdhyb-ThinkPad-X1-Carbon-3rd:~# cat /etc/os-release
PRETTY_NAME="Debian GNU/Linux 13 (trixie)"
NAME="Debian GNU/Linux"
VERSION_ID="13"
VERSION="13 (trixie)"
VERSION_CODENAME=trixie
DEBIAN_VERSION_FULL=13.1
ID=debian
HOME_URL="https://www.debian.org/"
SUPPORT_URL="https://www.debian.org/support"
BUG_REPORT_URL="https://bugs.debian.org/"
root@wdhyb-ThinkPad-X1-Carbon-3rd:~# cat /proc/cpuinfo
processor       : 0
hart            : 0
isa             : rv64imafdc
mmu             : sv39
uarch           : thead,c906
mvendorid       : 0x5b7
marchid         : 0x0
mimpid          : 0x0
Test Conclusion
The system should boot up normally and allow login through the onboard serial port.
Source: Support Matrix